使用Hexo搭建属于静态博客

使用Hexo搭建属于静态博客
阿呆配置环境
安装hexo并初始化
首先创建一个文件夹,进入并右键选择Open Git Bash here输入
安装hexo并初始化
1 | npm install hexo-cli -g |
创建文件夹并进入
1 | mkdir blog |
安装并初始化hexo
1 | npm install hexo-cli -g |
打开文件管理器创建blog文件夹
打开termux进入blog文件夹
1 | cd /storage/shared/blog |
这样进入blog文件比较繁琐可以创建一个链接
1 | echo "alias cdblog='cd ~/storage/shared/blog'" >> ~/.bashrc |
之后输入cdblog进入blog文件夹中
1 | cdblog |
初始化hexo
1 | npm install hexo-cli -g |
错误
在部署网站的时候提示以下错误,
1 | fatal: detected dubious ownership in repository at '/storage/emulated/0/blog/.deploy_git' |
解决办法
1 | git config --global --add safe.directory /storage/emulated/0/blog/.deploy_git |
1 | hexo g //生成网站静态文件 |
创建Github page
打开GitHub,并创建账号。
登陆之后点击Create a new repository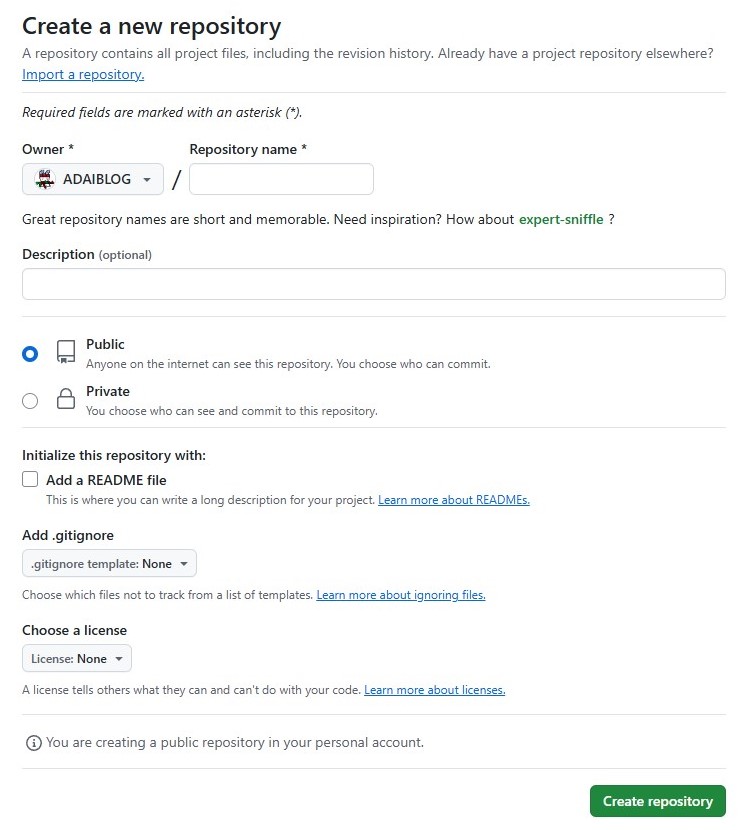
Repository name输入GitHub名称.github.io点击Create repository
例如GIthub名称 adaiblog , Repository name:adaiblog.github.io
Hexo关联Github
在Git Bash中输入
- 安装deploy-git
1
npm install hexo-deployer-git --save
- 绑定github用户名,邮箱
1
2git config --global user.name "GithubName"
git config --global user.email "GithubEmail" - 检查关联账户是否正确
1
git config --list
- 创建
SSH keys输入之后一路回车,1
ssh-keygen -t rsa -C "GithubEmail"
Windows在C:\Users\adai/.ssh找到id_rsa.pub并复制其中的内容\adai为windoss用户名,根据自身名称查找
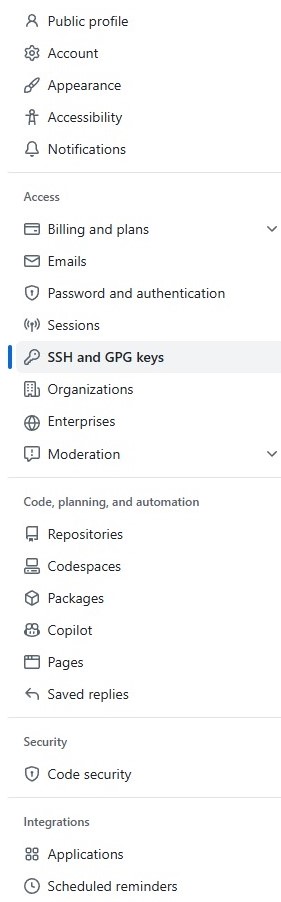
Android:在termux文件夹中打开.ssh文件夹 - 点击Github个人头像找到
setting->SSH and GPG keys->New SSH keyb,将id_rsa.pub内容复制到Key中
- 验证ssh
1
ssh -T git@github.com
如果报错connect to host github.com port 22: Connection refused,说明github被墙
在C:\Users\adai\.ssh目录下创建config文件输入一下内容保存1
2
3Host github.com
Hostname ssh.github.com
Port 443 - 打开博客文件中的
_config.yml拉到最下面输入1
2
3
4deploy:
- type: 'git'
repo: git@github.com:GithubName/GithubName.github.io.git
branch: master - 保存之后在
Git Bash输入1
2
3
4
5
6
7
8
9
10
11
12#生成静态文件
hexo g
#部署上传到github
hexo d
# 其他hexo操作
# 创建文章
hexo new "Name"
#本地服务预览
hexo s
# 清除缓存文件
hexo clean
搭建部分错误
提示Please make sure you have the correct access rights and the repository exists.
可能是git绑定名称邮箱不对,或者密钥错误,这里我们查看并重新生成密钥
1 | git config --list //查看user.name,user.eamil是否正确,不正确重新设置 |
更换主题
打开Hexo主题,下载主题文件,将文件复制到blog文件夹下面的themes中,并打开 _config.yml找到theme:landscape,将landscape改成下载主题文件夹名称
绑定域名 开启HTTPS
进入到域名管理页面,点击域名解析创建两条记录
记录类型 CNAME
主机记录 www
记录值:博客地址
记录类型 CNAME
主机记录 @
记录值:博客地址
在blog目录中进入source,并创建一个名为 CNAME,内容输入域名保存
打开Github,点击创建的 GIthub用户名.github.io仓,进入点击上方 Settings,选择 Pages在Custom domain中输入域名并勾选Enforce HTTPS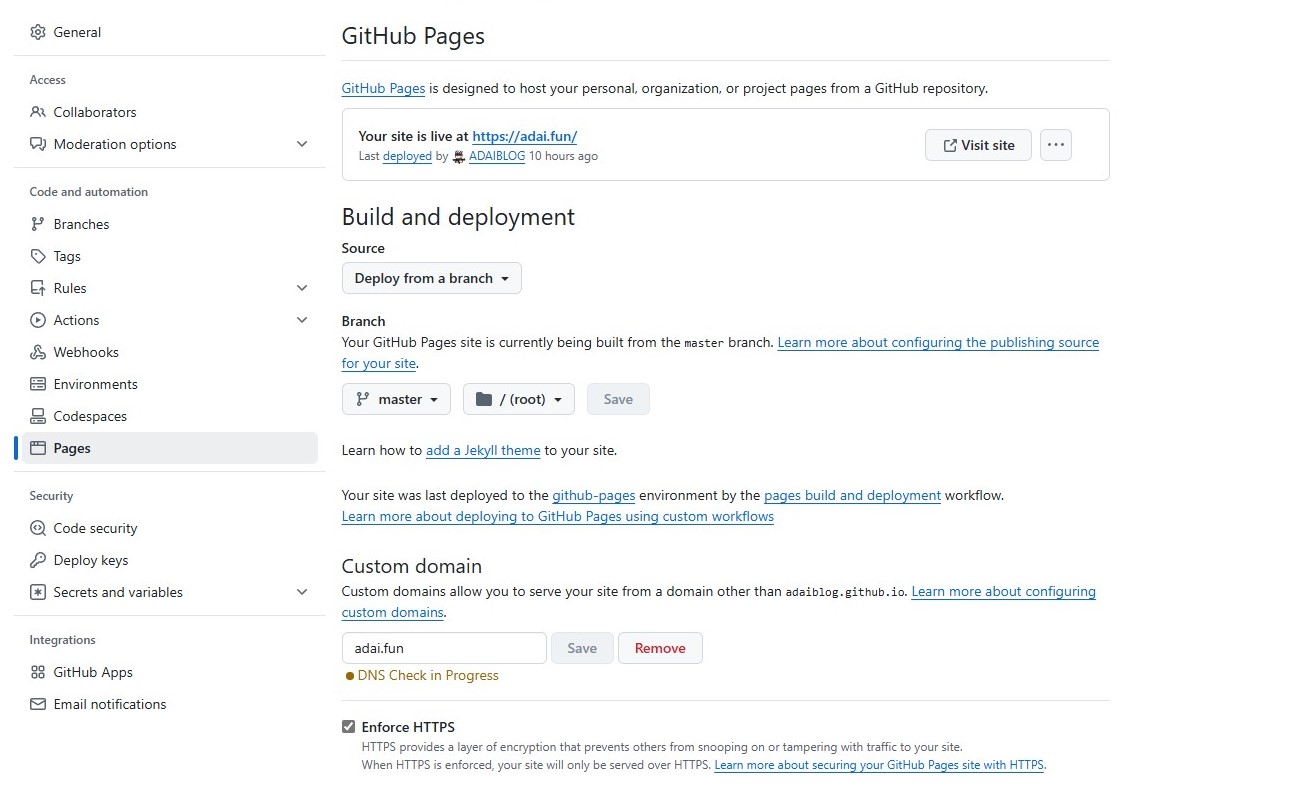
多端同步
完成环境配置和hexo关联github,
创建blog文件夹将除了node_modules和public文件夹之外的项目全部复制进来
进行blog文件夹中
1 | # 进入博客文件夹 |
网络原因,查看是否开启github加速器等软件,关闭尝试看是否成功。
如还是不行,检查是否能连接github.com
1 | ssh -T git@github.com |
如提示:ssh: connect to host github.com port 22: Connection refused,22端口不行就改成443端口
在C:\Users\用户名.ssh(也就是密钥文件地方)创建一个config并输入以下内容保存
1 | Host github.com |
- hexo d错误无法上传这个时候打开博客文件夹找到/source/_posts/.git删除.git文件夹以解除仓库状态,随后清理Hexo缓存和生成文件,并重新上传
1
2
3
4
5
6
7
8
9
10
11INFO Deploying: git
INFO Clearing .deploy_git folder...
INFO Copying files from public folder...
INFO Copying files from extend dirs...
error: 'source/_posts/' does not have a commit checked out
fatal: adding files failed
FATAL Something's wrong. Maybe you can find the solution here: https://hexo.io/docs/troubleshooting.html
Error: Spawn failed
at ChildProcess.<anonymous> (/data/data/com.termux/files/home/adaiblog/node_modules/hexo-util/dist/spawn.js:47:31)
at ChildProcess.emit (node:events:507:28)
at ChildProcess._handle.onexit (node:internal/child_process:294:12)1
2
3hexo clean
hexo g
hexo d - 在上传推送时报错如下
错误:
1
2
3
4remote: error: GH013: Repository rule violations found for refs/heads/ locations:
remote: - blob id: 11b09fbc1e4dac6df5822fa90bb454c8e16707a9 remote:
remote: (?) To push, remove secret from commit(s) or follow this URL to allow the secret.
remote: https://github.com/ADAIBLOG/adaiblog.github.io/security/secret-scanning/unblock-secret/2xUu0IVzQxUGN05ytuE7IXPXMkN remote:解决办法:只需要找到secret from commit(s) or follow this URL to allow the secret.,中的地址进入同意即可。
错误:LF will be replaced by CRLF
解决办法:git config –global core.autocrlf false //禁用自动转换
博客短链接地址
打开_config.yml,找到permalink并修改
1 | permalink: posts/:id.html |
在文章上面加入ID:xxxx作为文章地址
生成站点xml
安装站点地图生成插件
1 | npm install hexo-generator-sitemap --save //谷歌 |
打开根目录_config.yml添加
1 | sitemap: |
在跟目录source文件夹中创建robots.txt并输入
1 | User-agent: * |
屏蔽某个文章在其Front-matter中添加
1 | sitemap: false |
添加RSS订阅
安装插件
1 | npm install hexo-generator-feed --save |
打开根目录_config.yml添加
1 | feed: |
加密文章
安装插件
1 | npm install --save hexo-blog-encrypt |
在文章信息头添加
1 |
|
需要全局设置可以在博客_config.yml中添加
1 | # Security |
如果设置tag,就是根据标签来同意加密文章和密码